Features
Categories:
5 minute read

Features
The user interface is still under development and therefore does not offer so many features yet. However, we are working on it to support more and more features. If you find ideas for new features or bugs post an issue in the GitHub repository.
Creating an application
In Oakestra there is the principle of applications and services, within one application there can be several services and one user can create several applications.
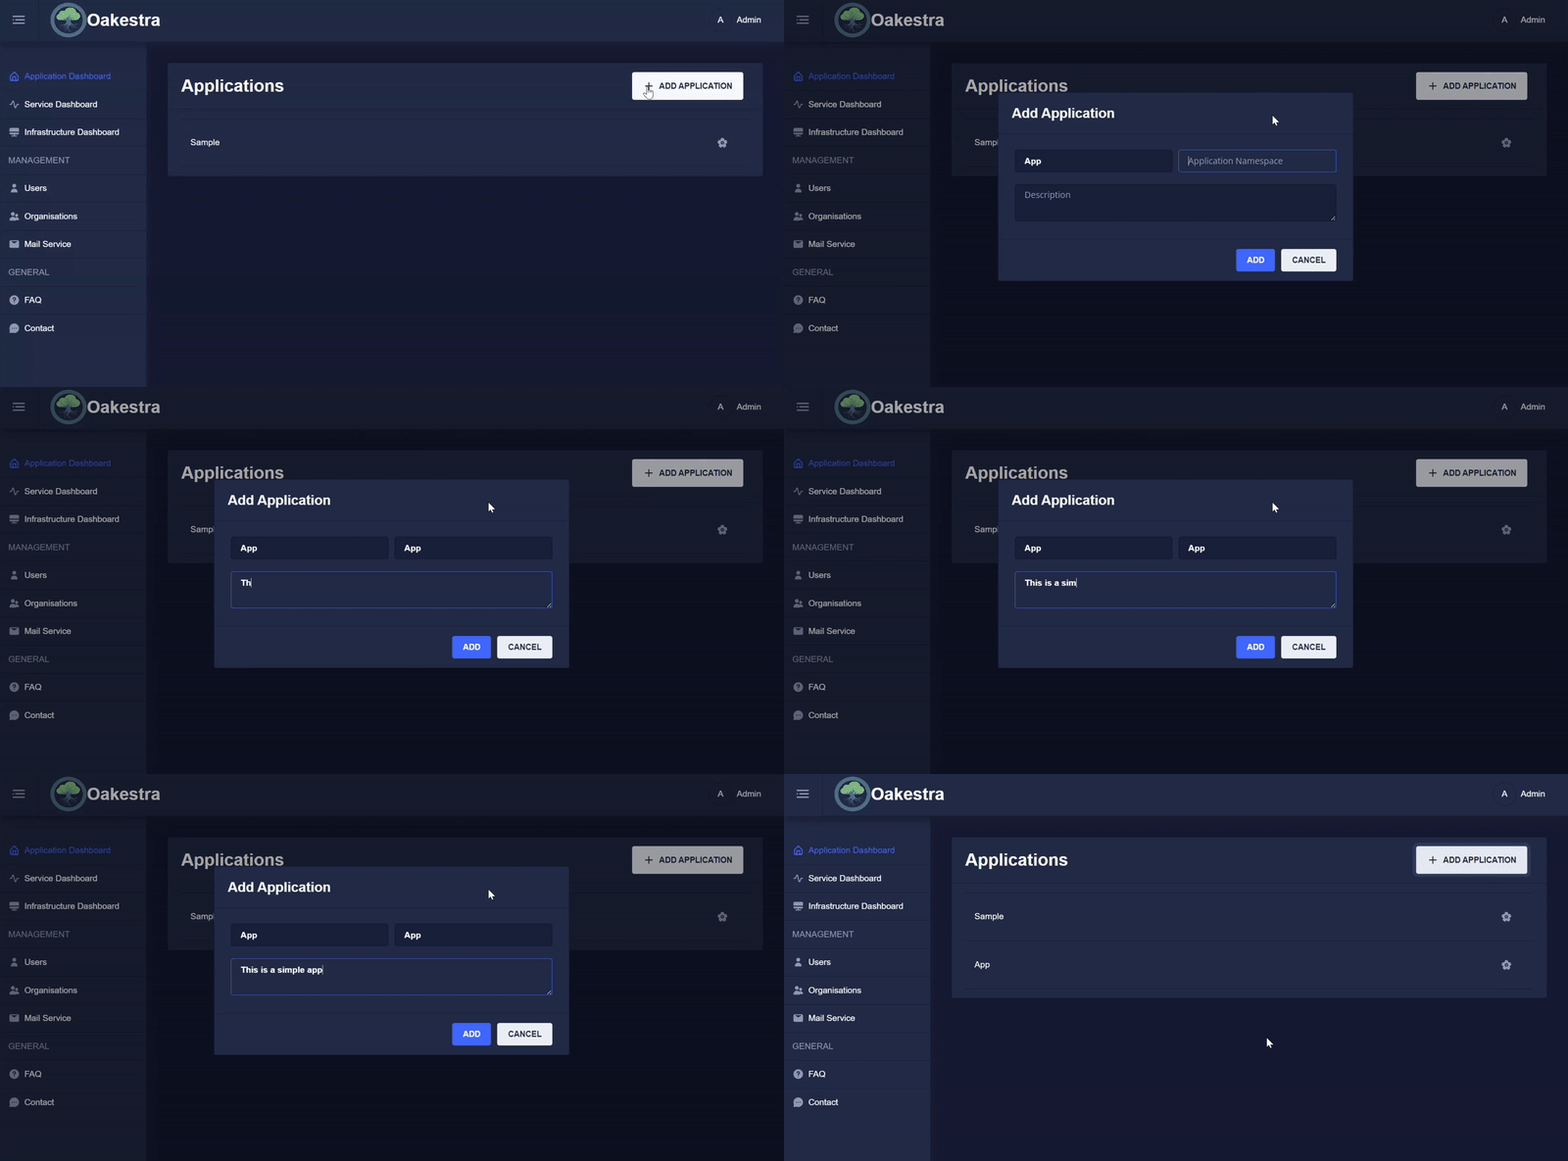
In order to create a service, an application must first be created. This is very simple, you only need to specify the name, the namespace and an optional description.
Creating a service
To create a service, you can use the APIs as described here. Another option is to create a service with the dashboard, which makes this process much easier.
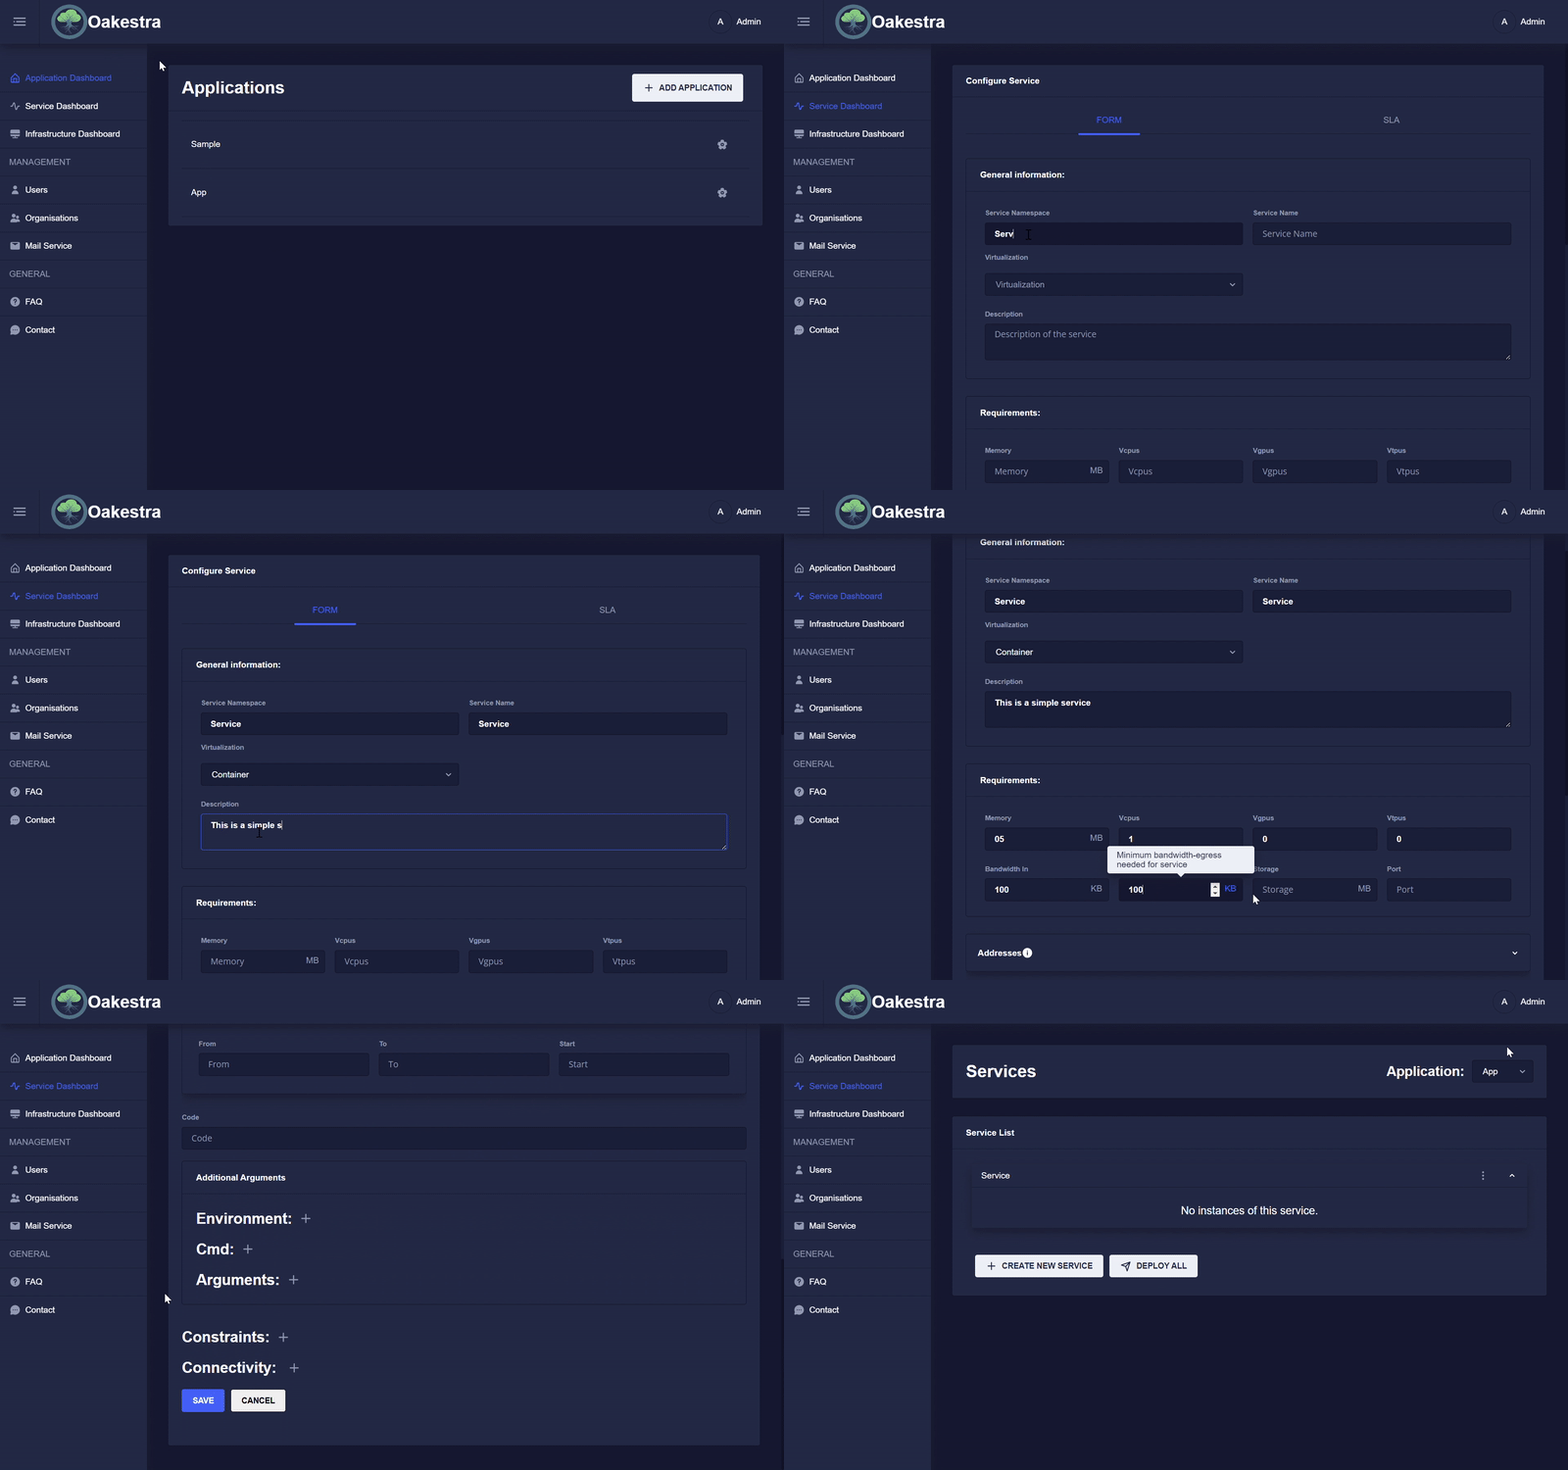
As described in other parts of the documentation, an SLA definition (Service Level Agreement) must be created for the creation of an application. This can be done easily using the various input fields in the dashboard.
To do this, first create an application or select the appropriate application in which a new service should be created. Then you can create a service in this application by entering the various values in the form. The dashboard then creates the SLA provisioning descriptor based on your input and sends it to the root orchestrator.
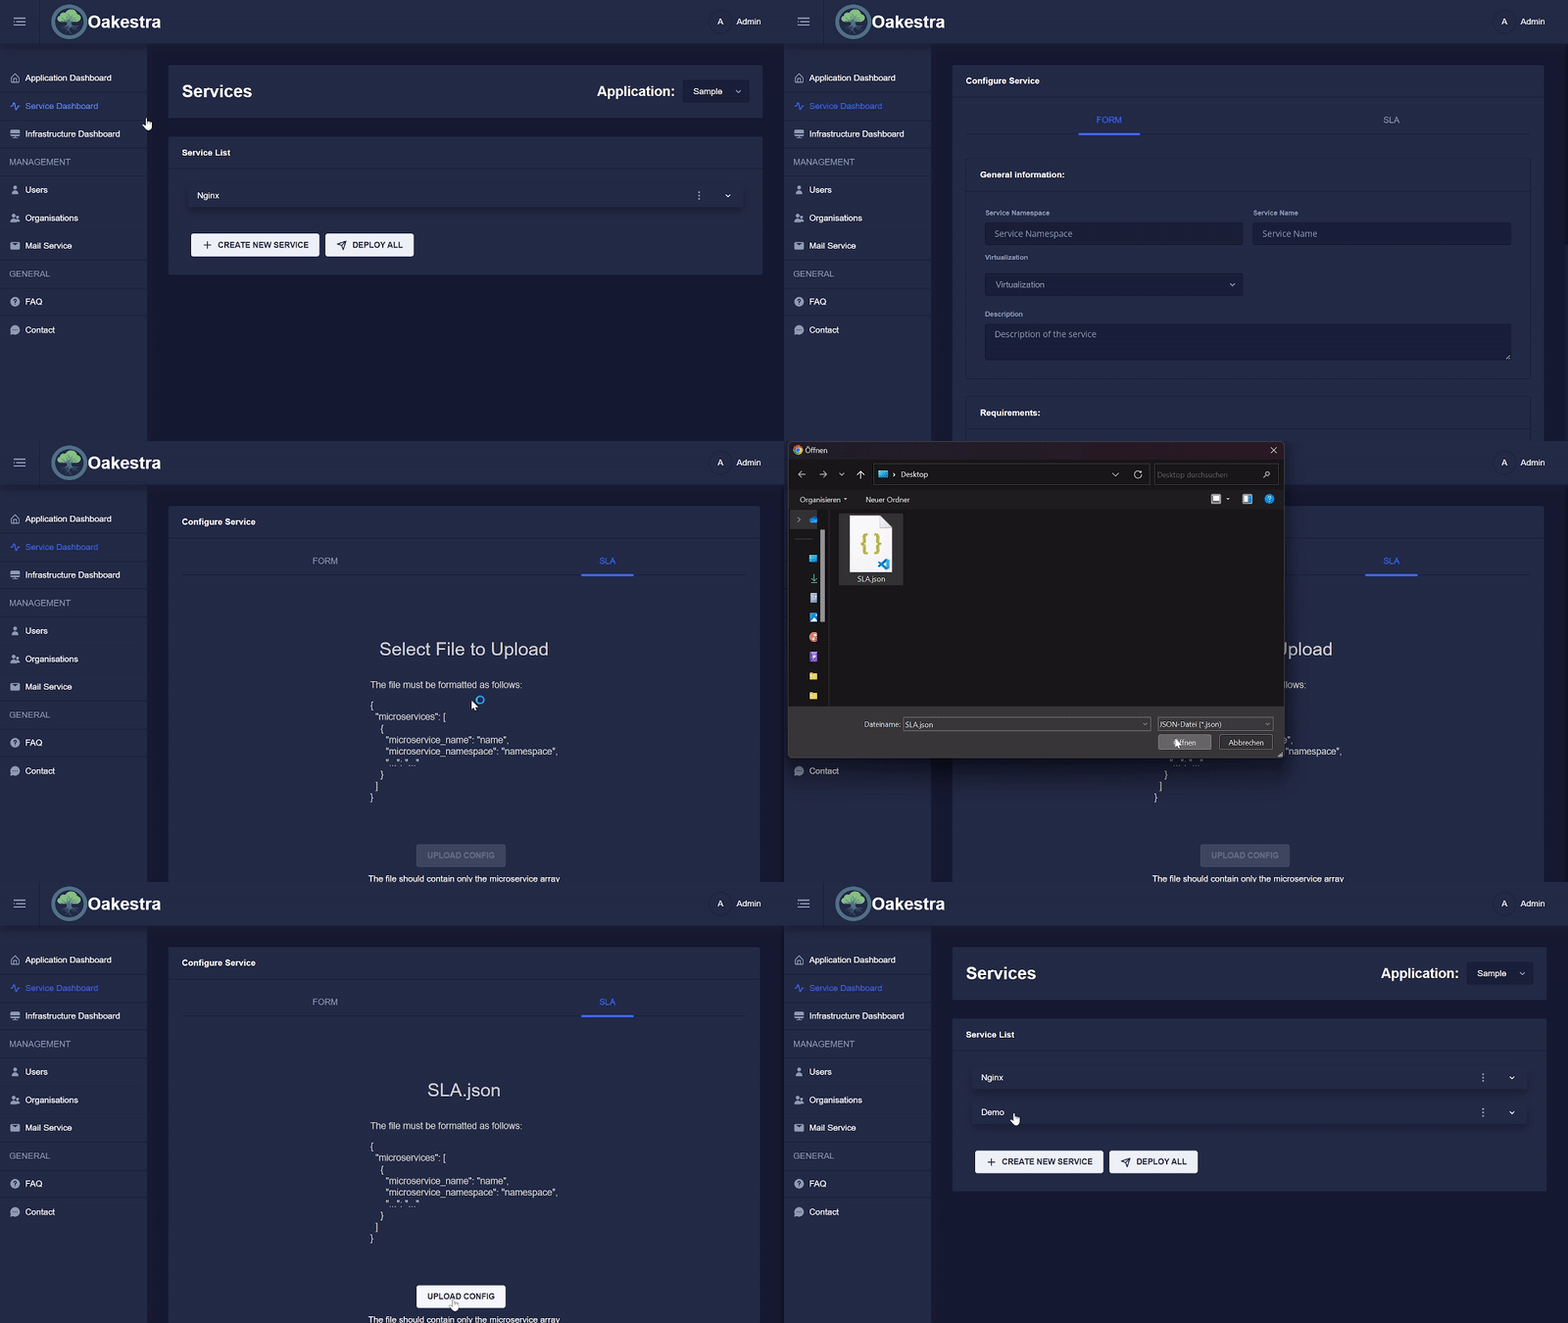
If you already have other SLA configurations, you can upload this configuration to the dashboard, and it will send everything to the root.
Please note that the JSON file should have the following format.
{
"microservices" : [
        {
          "microserviceID": "",
          "microservice_name": "curl",
          "microservice_namespace": "test",
          "virtualization": "container",
          "cmd": ["sh", "-c", "tail -f /dev/null"],
          "memory": 100,
          "vcpus": 1,
          "vgpus": 0,
          "vtpus": 0,
          "bandwidth_in": 0,
          "bandwidth_out": 0,
          "storage": 0,
          "code": "docker.io/curlimages/curl:7.82.0",
          "state": "",
          "port": "9080",
          "added_files": []
        },
        {
          "microserviceID": "",
          "microservice_name": "nginx",
          "microservice_namespace": "test",
          "virtualization": "container",
          "cmd": [],
          "memory": 100,
          "vcpus": 1,
          "vgpus": 0,
          "vtpus": 0,
          "bandwidth_in": 0,
          "bandwidth_out": 0,
          "storage": 0,
          "code": "docker.io/library/nginx:latest",
          "state": "",
          "port": "6080:80/tcp",
          "addresses": {
            "rr_ip": "10.30.30.30"
          },
          "added_files": []
        }
      ]
}
The microservice array can then contain any number of service configurations.
Service Details
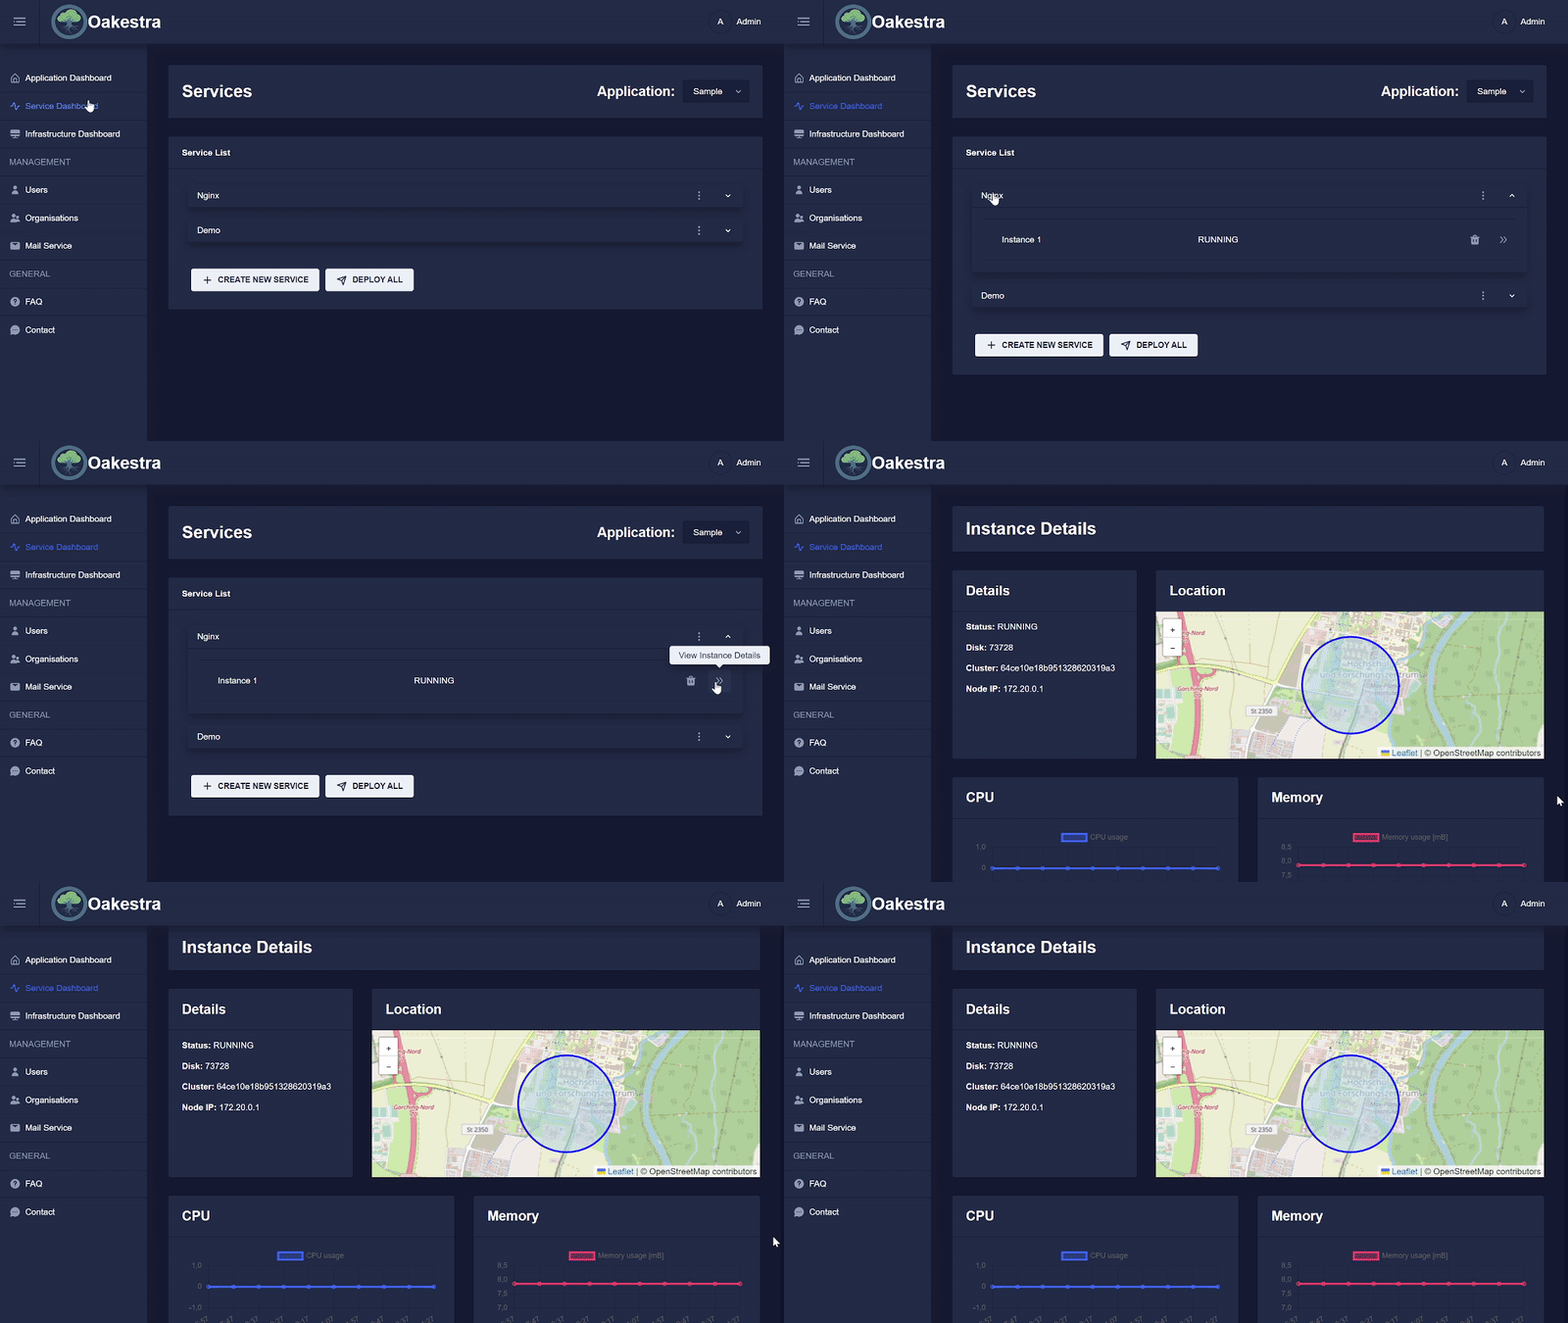
Once a service has been created and deployed, the parts of an instance can be viewed. To do this, click on the arrow in the instance list.
Roles
After a successful login, the user receives a JWT token that authenticates the user. The token contains the user’s roles and the organization ID in which the user is currently logged in. We distinguish between the following different roles.
Admin
The admin is created at the start of the root orchestrator. He can create new users, create organizations, add users to organizations and change settings in the complete system.
Organization Admin
A user with this role is the admin of an organization he can add new users to the organization and manage their roles within the organization.
Infrastructure Provider
A user with this role can add resources that can then be used to deploy applications there.
Application Provider
This is the default role of a user, he can create applications and services and manage them accordingly.
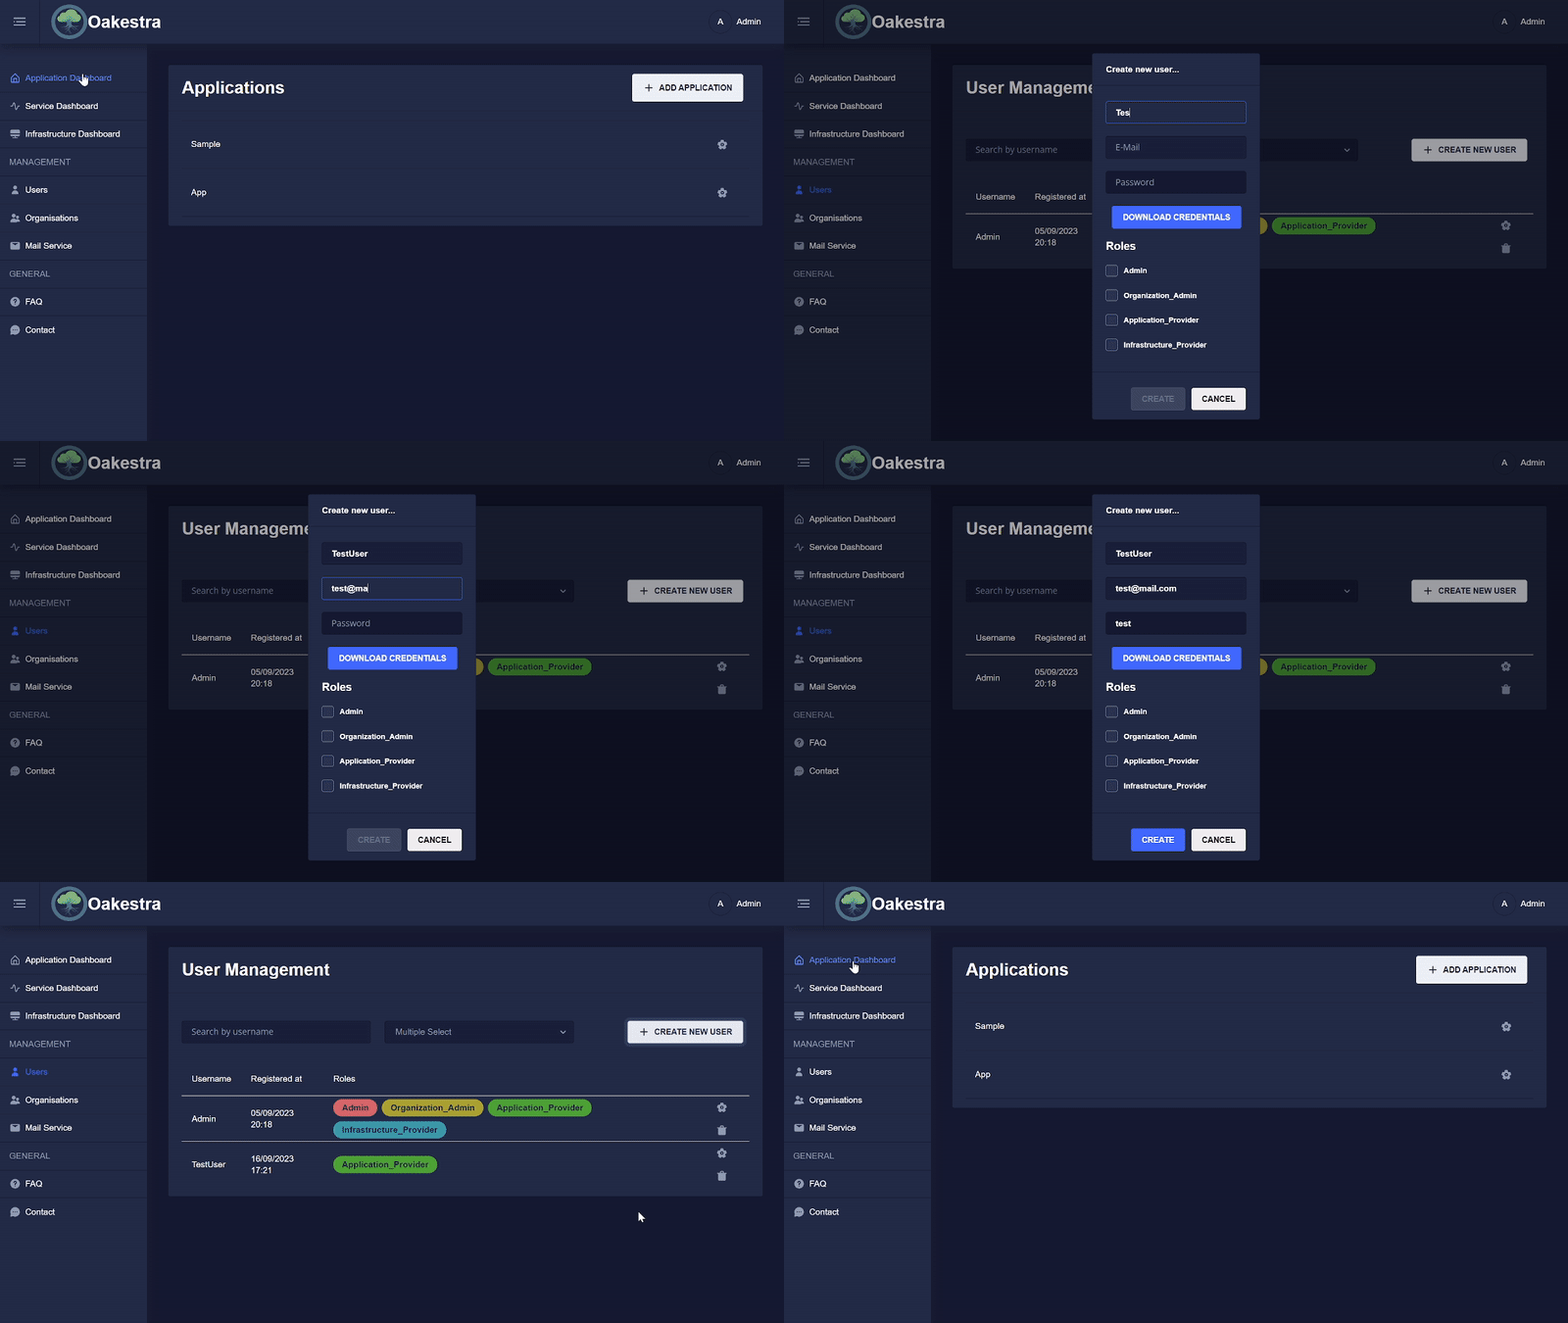
User Management
The admin can easily add a new user in the user management and assign him appropriate roles.
Organizations
An Organization in Oakestra is a fundamental unit designed to facilitate and enhance collaboration among team members. It serves as a container for projects, applications, and resources, providing a structured and efficient environment for collective work. Within an organization, team members share a common space where they can collaboratively develop, manage, and deploy applications.
Key attributes of an Oakestra Organization include:
-
Collaborative Space: Organizations provide a dedicated space for team members to work together. This shared environment ensures that all members have visibility into the applications and projects associated with the organization.
-
Access Control: Members of an organization enjoy access to all applications created within that organizational context. This access control mechanism streamlines collaboration by allowing team members to contribute to shared projects seamlessly.
-
Resource Utilization: The organization serves as a hub for resource management. Team members can utilize the resources provided within the organization to deploy new services, fostering an efficient and centralized approach to application development.
Root Organization
When the root orchestrator is started for the first time, a root organization is also created with the admin, and each user is automatically part of this root organization. However, users can also be part of other organizations. The root organization has specific properties. Unlike other organizations, where a user can view all applications within the organization and share resources, in the root organization, only the applications that a user has created can be viewed.
E-mail Configuration
The admin of Oakestra can configure an SMTP server in the settings.
If no SMTP server is configured, the official Oakestra mail service can be used in the future.
Currently, mails are sent in the following scenarios:
- When creating a new user, the user receives a mail with the password previously set by the admin.
- When changing the password of a user
- And to reset the password of a user.
If nothing is configured, no mails are sent and the admin must reset the password for the user.
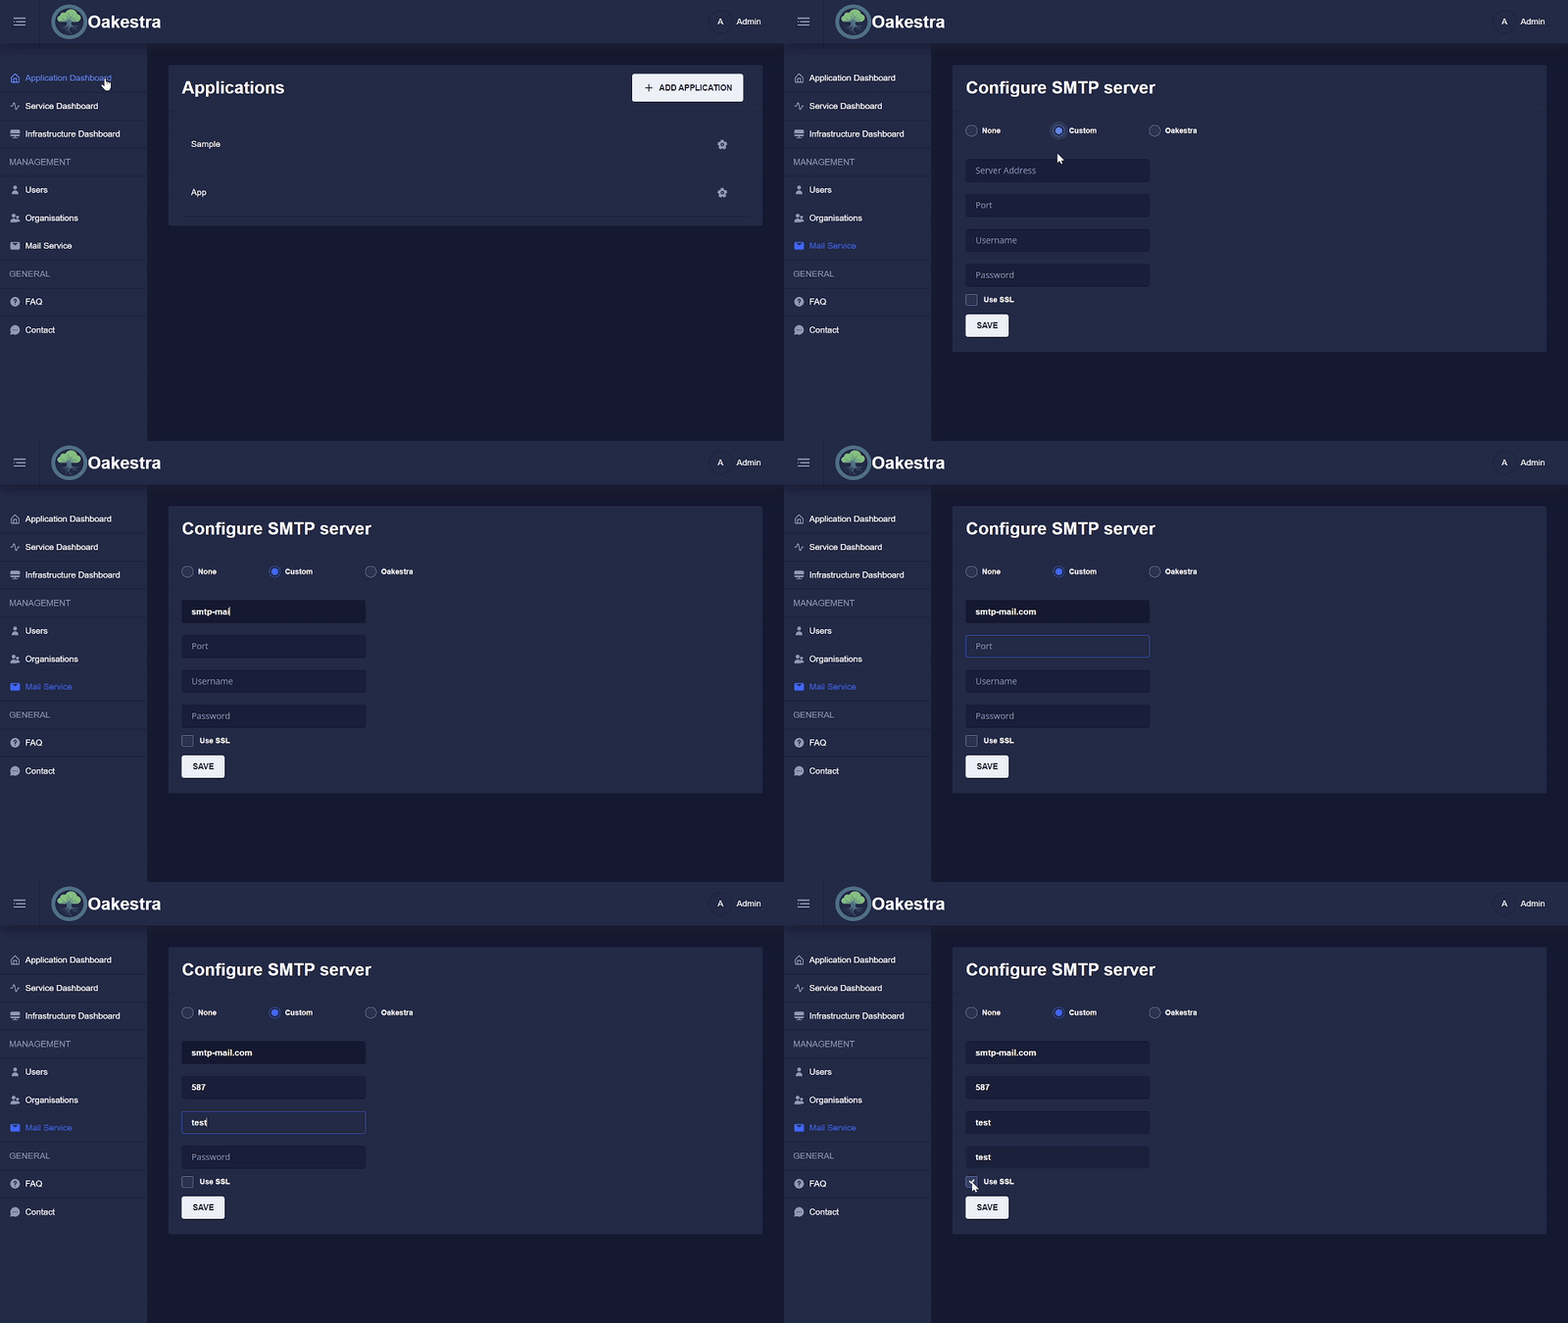
Important: This feature is implemented in the frontend but not yet 100% in the backend and therefore might not work yet. Here you can see the GitHub issue for this feature.