Your First Oakestra Cluster
Categories:
5 minute read

Table of content:
High-level architecture
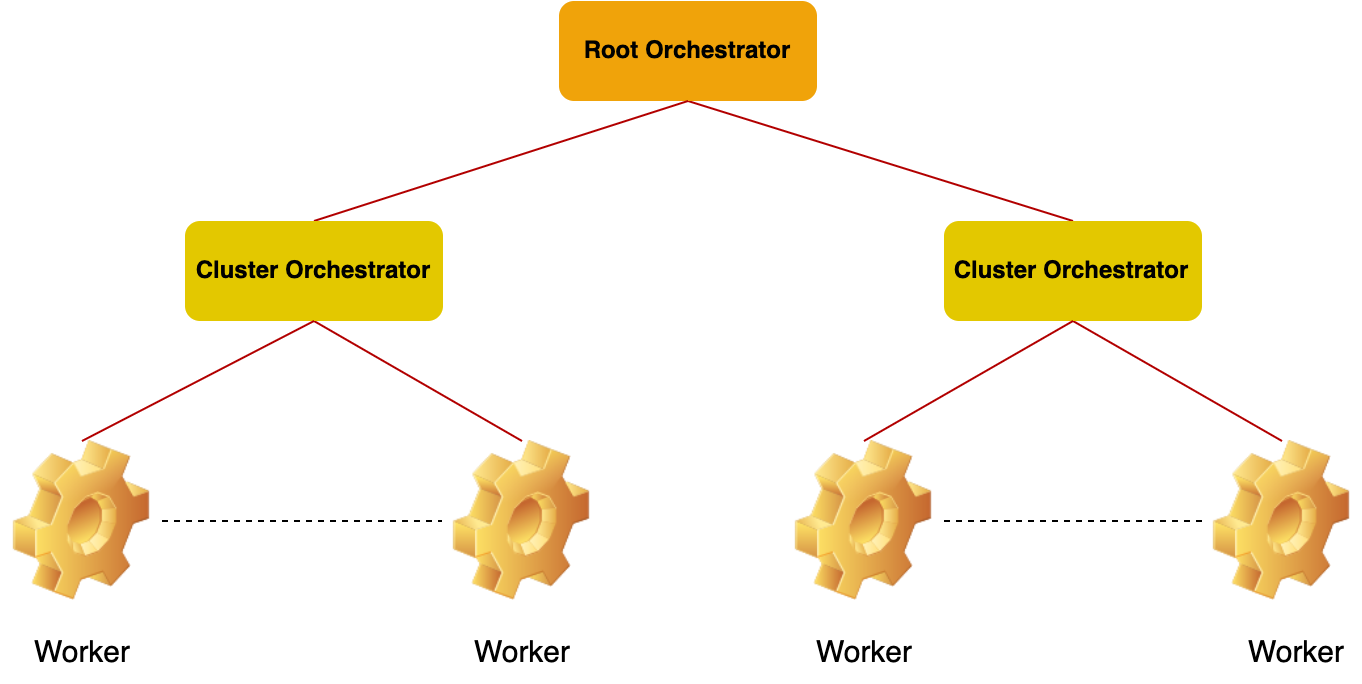
Oakestra lets you deploy your workload on devices of any size. From a small RasperryPi to a cloud instance far away on GCP or AWS. The tree structure enables you to create multiple clusters of resources.
- The Root Orchestrator manages different clusters of resources. The root only sees aggregated cluster resources.
- The Cluster orchestrator manages your worker nodes. This component collects the real-time resources and schedules your workloads to the perfect matching device.
- A Worker is any device where a component called NodeEngine is installed. Each node can support multiple execution environments such as Containers (containerd runtime), MicroVM (containerd runtime), and Unikernels (mirageOS).
Disclaimer, currently, only containers are supported. Help is still needed for Unikernels and MicroVMs.
Create your first Oakestra cluster
Let’s start simple with a single node deployment, where all the components are in the same device. Then, we will separate the components and use multiple devices until we’re able to create multiple clusters.
Requirements:
- Linux (Workers only)
- Docker + Docker compose (Orchestrators only)
- Cluster Orchestrator and Root Orchestrator machines must be mutually reachable.
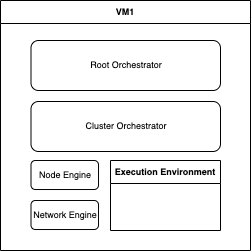
1-DOC (1 Device, One Cluster)
In this example, we will use a single device to deploy all the components. This is not recommended for production environments, but it is pretty cool for home environments and development.
1)
Let’s start the Root, the dashboard, and a cluster orchestrator on your machine.
curl -sfL oakestra.io/getstarted.sh | sh -
2) download, untar and install the node engine and network manager binaries
curl -sfL https://raw.githubusercontent.com/oakestra/oakestra/develop/scripts/InstallOakestraWorker.sh | sh -
3) Configure the Network Manager by editing /etc/netmanager/netcfg.json as follows:
{
  "NodePublicAddress": "<IP ADDRESS OF THIS DEVICE>",
  "NodePublicPort": "<PORT REACHABLE FROM OUTSIDE, use 50103 as default>",
  "ClusterUrl": "localhost",
  "ClusterMqttPort": "10003"
}
4) start the NetManager on port 6000
sudo NetManager -p 6000 &
5) start the NodeEngine.
sudo NodeEngine -n 6000 -p 10100 -a <Cluster Orchestrator IP Address>
( you can use NodeEngine -h for further details )
If you see the NodeEngine reporting metrics to the Cluster…
🏆 Success!
✨🆕✨ If the worker node machine has KVM installed and it supports nested virtualization, you can add the flag -u=true to the NodeEngine startup command to enable Oakestra Unikernel deployment support for this machine.
M-DOC (M Devices, One Cluster)
The M-DOC deployment enables you to deploy One cluster with multiple worker nodes. The main difference between this deployment and 1-DOC is that the worker nodes might be external here, and there can be multiple of them.
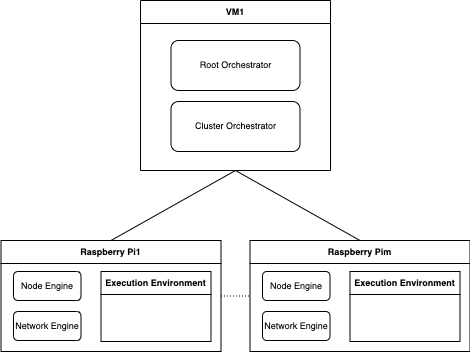
The deployment of this kind of cluster is similar to 1-DOC. We first need to start the root and cluster orchestrator. Afterward, we can attach the worker nodes.
1) On the node you wish to use as a cluster and root orchestrator, execute steps 1-DOC.1.
2) Now, we need to prepare all the worker nodes. On each worker node, execute the following:
2.1) Downlaod and unpack both the NodeEngine and NetManager
curl -sfL https://raw.githubusercontent.com/oakestra/oakestra/develop/scripts/InstallOakestraWorker.sh | sh -
2.2) Edit /etc/netmanager/netcfg.json accordingly:
{
  "NodePublicAddress": "<IP ADDRESS OF THIS DEVICE>",
  "NodePublicPort": "<PORT REACHABLE FROM OUTSIDE, internal port is always 50103>",
  "ClusterUrl": "<IP ADDRESS OF THE CLSUTER ORCHESTRATOR>",
  "ClusterMqttPort": "10003"
}
2.3) Run the NetManager and the NodeEngine components:
sudo NetManager -p 6000 &
sudo NodeEngine -n 6000 -p 10100 -a <IP ADDRESS OF THE CLSUTER ORCHESTRATOR>
MDNC (M Devices, N Clusters)
This represents the most versatile deployment. You can split your resources into multiple clusters within different locations and with different resources. In this deployment, we need to deploy the Root and the Cluster orchestrator on different nodes. Each independent clsuter orchestrator represents a cluster of resources. The worker nodes attached to each cluster are aggregated and seen as a unique big resource from the point of view of the Root. This deployment isolates the resources from the root perspective and delegates the responsibility to the cluster orchestrator.
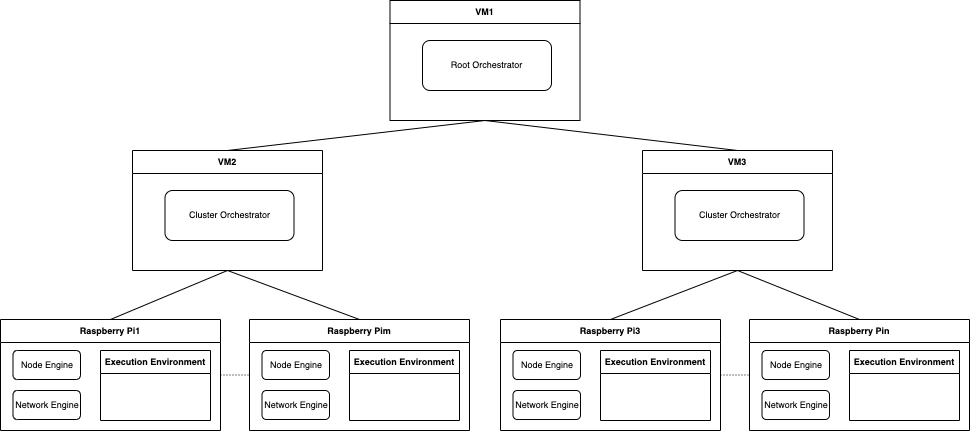
1) In this first step, we need to deploy the RootOrchestrator component on a Node. To do this, you need to clone the repository on the desired node, move to the root orchestrator folder, and execute the startup command.
git clone https://github.com/oakestra/oakestra.git && cd oakestra

export SYSTEM_MANAGER_URL=<IP ADDRESS OF THE NODE HOSTING THE ROOT ORCHESTRATOR>
sudo -E docker-compose -f root_orchestrator/docker-compose.yml up
2) For each node that needs to host a cluster orchestrator, you need to: 2.1) Export the ENV variables needed to connect to the cluster orchestrator:
export SYSTEM_MANAGER_URL=<IP ADDRESS OF THE NODE HOSTING THE ROOT ORCHESTRATOR>
export CLUSTER_NAME=<choose a name for your cluster>
export CLUSTER_LOCATION=<choose a name for the cluster's location>
2.2) Clone the repo and run the cluster orchestrator:
git clone https://github.com/oakestra/oakestra.git && cd oakestra

sudo -E docker-compose -f cluster_orchestrator/docker-compose.yml up
3) Start and configure each worker as described in M-DOC.2
Hybrids
You should have got the gist now, but if you want, you can build the infrastructure by composing the components like LEGO blocks. Do you want to give your Cluster Orchestrator computational capabilities for the deployment? Deploy there the NodeEngine+Netmanager components, and you’re done. You don’t want to use a separate node for the Root Orchestrator? Simply deploy it all together with a cluster orchestrator.